Showing posts with label Kefir. Show all posts

Monday, July 14, 2014

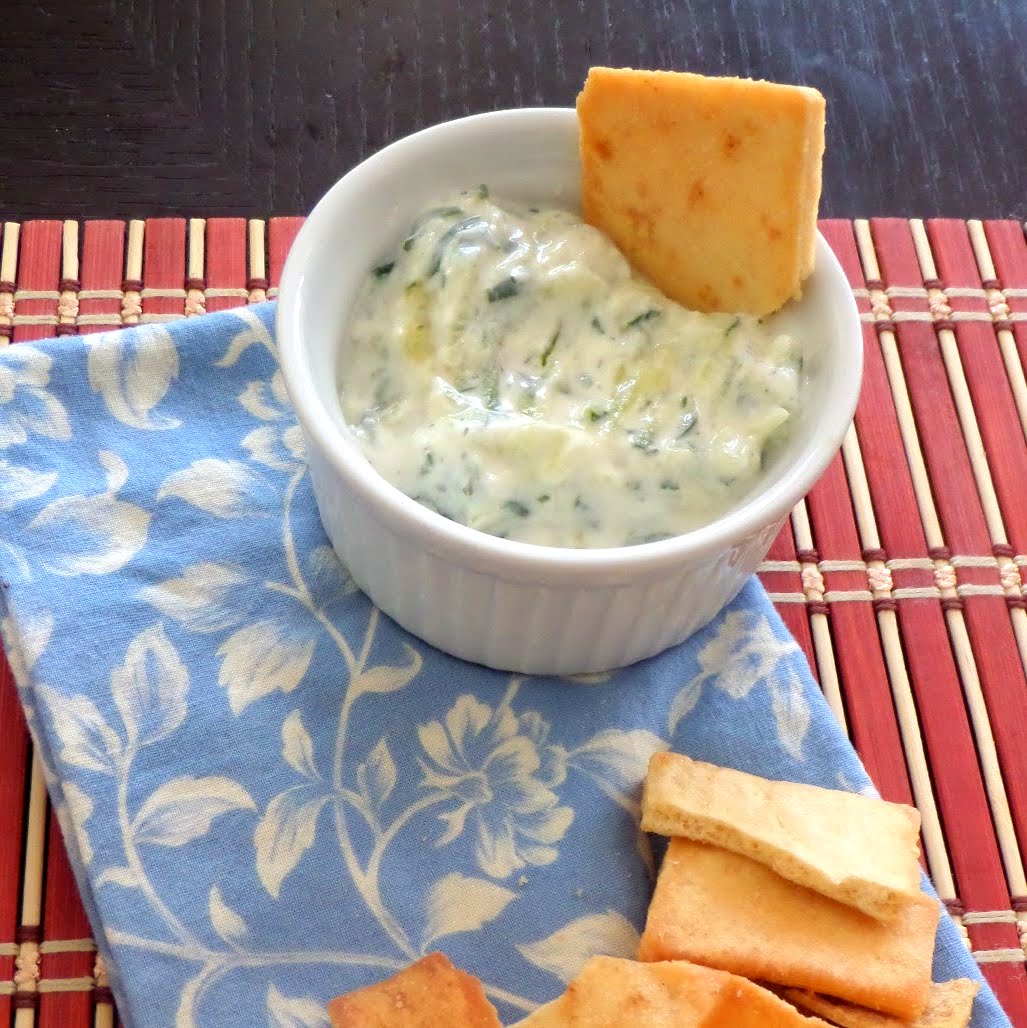
Tzatziki

Yum

A deliciously cool and refreshing yogurt dip/sauce made with cucumbers and dill.


Tzatziki:  A deliciously cool and refreshing yogurt dip/sauce made with cucumbers and dill.


Tzatziki is one of my favorite Greek condiments.  Most often I've had it in gyros or with lamb and pita as a dip.  It is super flavorful and delicious with plenty of cool cucumber and yogurt.  This was my first attempt at making tzatziki and it was very simple and delicious.

Tzatziki:  A deliciously cool and refreshing yogurt dip/sauce made with cucumbers and dill.

One main component of tzatziki is Greek yogurt.  I didn't feel like buying yogurt so I used strained kefir ("a fermented milk drink"-wikipedia).  I always keep kefir on hand and mostly use it in smoothies or as a substitute for buttermilk in baking but it has many uses.  One of these uses is that it makes a great yogurt like substitute when strained.  You just line a mesh colander with a couple layers of cheesecloth or alternatively, I use an old, thin, white t-shirt rag (that's clean).  Then pour in about 3-4 cups of kefir and let it sit and drain until it is thickened to desired consistency.  I place the colander inside a large bowl to catch the liquid being drained off (this is whey and there are many uses for it too so no point in wasting it).  Usually by the time it is the right consistency it has drained off to about 1/2 to 1/3 the original volume and what you are left with is a thickened kefir of yogurt like consistency.  The flavor is a bit different, maybe more sour, but it works in a pinch.  For more information about kefir check out my Tutorial:  How to Make Kefir.

Tzatziki:  A deliciously cool and refreshing yogurt dip/sauce made with cucumbers and dill.

Tzatziki


Ingredients:

2 cups Greek yogurt or strained kefir
2 cucumbers, seeded and shredded
1 lemon
1-2 cloves garlic, grated or minced
1 tsp dried dill
salt

Tzatziki:  A deliciously cool and refreshing yogurt dip/sauce made with cucumbers and dill.

Place the shredded cucumbers into a cloth lined mesh colander.  Sprinkle with salt and allow to drain for about 10-15 minutes.  Then gather the sides of the cloth and twist it around the cucumber squeezing out even more liquid.

Stir together the cucumbers and yogurt with the juice of the lemon.  Add the garlic (I ran the cloves over a microplaine to make a very fine grate so you wouldn't bite into a big chunk of raw garlic) and dill and mix thoroughly.

Allow to sit in the fridge for at least 1 hour before serving.  Pour off any liquid that accumulates on top and serve as a dip or on sandwiches.

Makes about 6-8 servings.  Enjoy.

Tzatziki:  A deliciously cool and refreshing yogurt dip/sauce made with cucumbers and dill.


Linked to:  Two Cup, Teach Me, Lou Lou Girls, Whimsy Wednesday, Wednesday Roundup, Cook Craft Share, Full Plate, Eat Create Party, Freedom Friday, Pretty Pintastic, Best of the Weekend, See ya in the Gumbo, Much Ado, Tasty Tues, Yuck Stops Here, Plant Based Potluck


Follow Joy Bee's board Joybee Whats for Dinner blog posts on Pinterest.
Read more ...

Tuesday, March 19, 2013

Recipe Remake: A More Filling Granola

Yum

A sweet and crunchy granola made with nuts, seeds and rolled grains.  A great  breakfast or snack.


My goal for this granola is to have high protein, high fiber and more calories.  I am not a good breakfast eater, and I usually do not feel like eating much first thing in the morning.  So I am trying to make this granola more filling so it satisfies my hunger and lasts until lunch time.  This granola recipe is a remake of my basic How to Make Granola.  I used more of a mix of nuts, seeds and rolled grains, but the basic recipe is still the same.  Here is what I used.


Ingredients:

1 cup sliced almonds
1 cup chopped pecans
1/2 cup sunflower seeds
1/2 cup flax seeds
2 cups rolled oats
1 cup rolled barley
1 cup 5 grain rolled cereal (barley, oats, rye, wheat and flax)
1/4 cup vegetable oil
1/4 cup brown sugar
1/4 cup maple syrup
1/2 tsp salt
1-2 cups raisins


Stir and mix the ingredients (except raisins) until all of the nuts and grains are coated with liquid.  Pour into a 9 by 13 inch baking pan (I use Pyrex).  Bake at 250F for 1.5-2 hours, stirring very 30 minutes until golden and crunchy.  Remove granola from oven and add raisins along the top as the granola cools.  Once cool, transfer to a seal-able container.  Serve over milk, yogurt, or kefir.  Enjoy.


Read more ...

Sunday, March 3, 2013

Whole Wheat Pancakes with Berry Syrup

Yum

Fluffy, low fat, whole wheat pancakes topped with a mixed berry syrup.  A great weekend breakfast.


I haven't made a big breakfast in two months.  Now my husband is back from his long trip I made him a good breakfast for his first weekend home.  I have really gotten stuck on this whole wheat pancake recipe it is the only kind of pancakes I make anymore.  I think this is a healthier version of pancakes, and it tastes great, I don't even crave regular pancakes.  This recipe uses whole wheat flour which is better for you than white (more processed) flour, and there is no added oil in the batter.  I probably ruin the low fat aspect of these pancakes by frying them in butter, but if there was oil or butter in the batter I would still fry them in butter so there is less fat.  You can probably make these completely without oil or butter if you use a good non stick skillet.  I also topped these pancakes with a delicious mixed berry syrup but they are terrific on their own or with just plain maple syrup.

Pancakes:

From Low Fat Whole Wheat Pancakes  also used in my Pumpkin Pancakes

1 cup whole wheat flour
1 tsp baking Powder
1/2 tsp baking soda
1/8 tsp salt
1 egg
1 cup kefir or buttermilk
2 Tbsp honey

Mix all of the dry ingredients in one bowl and the wet in a separate bowl.  When ready to make pancakes mix the wet with the dry ingredients and stir until just incorporated.  Fry about 1/3 cup of batter in a pan over medium-medium low heat until it starts to bubble and set (about 1 minute) then flip and cook the other side.  Makes about 6 pancakes.

Berry syrup:

1 cup frozen mixed berries (or fresh if you have them)
juice from 1 lemon
about 1/4 tsp lemon zest
1/4-1/3 cup maple syrup

In a small saucepan over medium low heat mix the above ingredients (start with less syrup and add more to sweeten to your taste).  Allow mixture to come to a boil then remove from heat and mash the berries with a potato masher, or the back of a fork.  You could also process in a blender for a smoother consistency, but I like the chunks of berries.  Pour into a container with a spout and serve over pancakes.  My husband doesn't like warm syrup, so I refrigerated the syrup for a while before serving.  The syrup turned out kind of runny, I liked it, but maybe you can thicken it with a little cornstarch (I'm not sure) if you want it thicker.

I served the pancakes with bacon and scrambled eggs.  Fruit would be a great addition if you have any. Enjoy.


Read more ...

Monday, February 4, 2013

How to Make Ricotta Cheese at Home

Yum

Making ricotta cheese at home is simply delicious and uses very few ingredients.  It's much easier than you might think.


How to Make Ricotta Cheese at Home:  it's much easier than you might think

I came across this recipe on pintrest.  Once I read through the ingredients and instructions I was amazed at how simple it seemed.  So I had to try it on my own.  Turns out it is simple and it worked using skim milk and kefir.  All I had to do was boil them together and spoon out the curds that floated to the top.  I was nervous because the recipe called for using whole milk and cream but I only had skim milk so that is what I used and it worked. I'm still excited about how cool and easy it was that I had to share.  I will definitely be making this again.

How to Make Ricotta Cheese at Home


Ingredients:

4 cups skim milk (or any milk)
1 cup kefir (or buttermilk) or 1-2 Tbsp lemon juice or vinegar

How to Make Ricotta Cheese at Home: Heat milk and kefir over medium heat

Pour the milk and kefir into a large sauce pan and heat over medium high heat (stirring constantly).

How to Make Ricotta Cheese at Home:  Milk and kefir mixture as it just starts to curdle

Let heat until it starts to boil (185F if you use a thermometer) and you will see curds float to the top, around 10 minutes.

How to Make Ricotta Cheese at Home:  Milk and kefir mixture right before boil

Be patient, the curds are very noticeable.  Take off the heat and, using a slotted spoon, scoop out the curds and drain in a cloth lined strainer.

How to Make Ricotta Cheese at Home:  let the whey drain off the curds

Let drain for about 15 minutes or until desired consistency.  Add some salt and place in a seal-able container, refrigerate until ready to use.  Makes 3/4-1 cup.

How to Make Ricotta Cheese at Home:  Strained ricotta

If you need ideas on how to use your fresh ricotta try these recipes:

Simple Lasagna
Ricotta Bread
Pepper and Onion Breakfast Pizza

Enjoy.

*updated 2/10/14
Read more ...

Sunday, February 3, 2013

Whole Wheat and Seed Pumpkin Muffins

Yum

Soft and delicious mini muffins made with whole wheat flour, ground sunflower seeds, ground flax seeds, and pumpkin.  Quite filling.


Happy Super Bowl everybody.  It seems like everywhere I look people are posting dip and appetizer recipes for your Super Bowl party.  I'm not having a Super Bowl party, I'll be watching (and Animal Planet's Puppy Bowl) but I'm watching alone.  I'm kind of a loner and when my husband is away I sometimes go weeks with out talking to anyone (other than myself).  Don't get me wrong, I like people and when my husband's around (he is much more extroverted than me) I enjoy having people over and I love making food for people.  But if there isn't someone around to invite people over I am perfectly happy being by myself...I guess I'm just weird.  So that means I am not making anything special for the Super Bowl today.  I wanted to post something, so I decided to post my recipe for Pumpkin Muffins.  I made these a while ago and froze half of them and for breakfast this morning I pulled a few out of the freezer, microwaved them for 1 minute, and they were as good as when they were fresh from the oven.

My thought process when I originally made these was that I wanted them to be healthy and filling.  I had about 3/4 cup of pureed pumpkin, leftover from another recipe, so I used this and decided to omit added oil or butter.  I also wanted to make these a bit more filling by using ground seeds to add some protein.  The end result was great, they are not too sweet, have a mild pumpkin and sunflower seed flavor, and are tender.  Here is my recipe.

Ingredients:

1 cup whole wheat flour
3/4 cup ground sunflower seeds (1/2 cup whole sunflower seed kernels ground in a blender)
1/4 cup flax seed meal (ground flax seeds)
4 Tbsp pumpkin pie spiced sugar (or brown sugar)
1/2 tsp baking soda
1 1/4 tsp baking powder
1/2 tsp salt
1 egg
3/4 cup pumpkin
1 cup kefir (or buttermilk)

Preheat oven to 375F with the rack in the middle.  In a large bowl, stir together dry ingredients until thoroughly combined.  In a separate bowl mix together wet ingredients.  Meanwhile prepare muffin tin(s) for baking by either lining them with paper cups or greasing them. When ready to bake the muffins, add the liquid to the dry ingredients and stir until combined.  Put into the prepared muffin tins and bake for about 15 minutes for mini muffins or 25 for regular sized muffins (check for doneness by inserting a wooden toothpick into the center, if it comes out clean they should be done).  Remove from pan and let cool for a few minutes before eating.  Makes 34 mini muffins.  Enjoy.

Read more ...

Wednesday, January 30, 2013

Whole Wheat Italian Bread (Sourdough)

Yum

A delicious and soft whole wheat sourdough loaf with a chewy crust.

My favorite bread to make is Italian bread.  It is one of the first breads I ever made back when I was a broke college student and just became interested in bread baking.  I still use the same bread book, The Bread Baker's Apprentice, which is the first bread cook/baking book I ever bought (also from my college days).  The poor book lost it's slip cover along time ago, is ripping at the seams, and has flour and oil stains on every page.  It has been well used.  I used the Italian Bread recipe (p. 172) with some slight modifications.  This bread uses a preferment (Biga) which I made with sourdough instead of commercial yeast and I used whole wheat flour instead of white flour.  I also used kefir instead of water in the Biga to help tenderize the bread further since I planned on using half for sandwich rolls.  This made a great soft whole wheat loaf with a slight tang of sourdough.  Here is my recipe (as usual all of my measurements are by weight).

Night before (Biga):


3 oz sourdough starter (100% hydration, equal parts flour and water)
11 oz whole wheat flour
6-7 oz kefir (or milk or water)

Final dough (next morning)

Biga (about 18 oz)
11.25 oz bread flour

.41 oz salt
.5 oz honey
.5 oz olive oil
7-8 oz water

The night before you plan to make the bread mix together all of the Biga ingredients.  Stir well until all of the flour is hydrated.  Cover and let sit out at room temperature over night (up to 12 hrs).

The next morning the Biga should be airy and bubbly.  Add all of the final dough ingredients into the bowl of a stand mixer.  Stir on low speed with the paddle attachment until all of the flour is hydrated and ingredients are thoroughly mixed creating a ball of dough (you may need to dribble in a little water until all of the flour is incorporated).

Switch to the dough hook and knead for 10 minutes.  The dough should be supple and elastic and tacky not sticky (you may need to add more flour while kneading to reach this consistency).

Transfer dough to a lightly oiled bowl rolling to coat it all over with oil.  Cover with plastic wrap and sit in a warm place for 4 hours until doubled in size.

Remove the risen dough from the bowl.  Cut in half.  You can make two 1-pound loaves, or I sometimes make 3 smaller loaves so they fit more easily on my baking stone.  This time I made 4 torpedo rolls and 1 loaf.  Place loaves and/or rolls on parchment or lightly floured sheet pans.  Cover with plastic wrap and allow to rise for about 2 hours and is 1 1/2 times original size.

Preheat oven and baking stone, on the lowest rack, to 500F for at least 45 minutes (if you are using sheet pans you can bake the loaves and rolls directly on the pan, no need to use the baking stone in this case).  Transfer the loaves or rolls to a peel or rimless baking sheet.  Score loaves with diagonal slits and rolls with one long slit (lengthwise).  Slide loves/rolls onto the baking stone (if you have trouble transferring loaves/rolls into oven, like I do, you can slide them in directly on the parchment paper but you have to pull the parchment out from under the bread after about 5 minutes because it will start to blacken and burn at such a high temperature) and spray the sides of the oven with water a few times to create steam, close the oven and then spray again after 30 seconds.  Do this 3 times then lower the temperature to 450F.  Bake loaves for 20 minutes and rolls for 15 turning 180 degrees half way through for even baking if necessary.

Allow to cool for at least 1 hour before cutting.  Enjoy.


Read more ...

Friday, January 18, 2013

Half Whole Wheat Sandwich Bread (Sourdough)

Yum

A delicious, soft, and sour sandwich loaf with the goodness of whole wheat.

*Submitted to YeastSpotting

I like to have sandwich bread on hand but I don't like to buy the usual kind you find in the stores.  Store bought sandwich bread is too soft and mushy and flavorless to my tastes.  It also has preservatives (which I have never used to make bread) and I think it's creepy to have bread for weeks before it starts to mold.  Mostly, I just enjoy making and baking my own bread.  There is something about the smell and taste of freshly baked bread that just makes me feel good and I like to think it is better for me than store bought.

My main struggle with sandwich bread is getting it so that it is soft (soft enough to make a good peanut butter and jelly with) and doesn't crumb too much.  What I have found (at least in my non-professional opinion) is that in order to achieve this  you need to keep the dough pretty soft and moist.  Do not add too much flour while kneading you want the dough to be soft and moist but not wet and sticky.  It is hard to explain because you know it is right by the feel.  I find that when kneading by hand I tend to add too much flour, to keep the dough from sticking to my hand, but since I started using a mixer it is easier to knead without adding too much flour.  It is still possible to do it by hand you just have to be aware of how much extra flour you are using (it is okay for it to stick slightly to your hand.  Maybe just dust your hands lightly with flour instead of sprinkling flour over the dough).

Ingredients:
*modified from Peter Reinhart's Whole Grain Breads 'transitional whole wheat bread'

Night before (barm)

3 oz sourdough starter
7 oz whole wheat flour
6 oz kefir or milk

Next day

barm
7 oz bread flour
1 tsp salt (.45oz)
2 oz honey
.5 oz vegetable oil
3-5 oz water

The night before you want to make your bread you need to make the barm.  This is just feeding the sourdough to build it to the amount you need for the recipe.  Take out  3 oz of the sourdough starter add 7 oz of whole wheat flour and 6 oz of kefir or milk. (I make the barm with the whole wheat flour because I think that the over night sit tenderizes it and moistens it this makes up for the soaker that many whole wheat recipes call for.  I also use kefir because I like the extra sour flavor it adds.)  Stir until all of the flour is hydrated then cover and let sit out at room temperature over night.

The next morning, the barm should be bubbly and airy. To the bowl of a stand mixer, add barm and rest of ingredients starting with only 3 oz of the water.  Stir on low speed with the paddle attachment until all of the flour is hydrated and forms a ball.  You may need to dribble in some of the extra water until this is achieved (remember it is better to start too wet than not wet enough, adding flour during kneading is easier than water) .
Switch to the dough hook and knead on medium speed for 5-6 minutes adding more flour (white or wheat) as necessary.  The dough should pull away from the sides of the bowl but just slightly stick on the bottom.  It should feel soft and elastic and be tacky not sticky.  Transfer dough to a large, oiled bowl rolling to coat the dough with oil.  Cover with plastic wrap and sit in  a warm place  to rise for 4 hours. (I sit my dough on my counter top under a small under-cabinet light that gets a little warm.  This is the  perfect temperature in my home.)
 When the dough has risen to double its size, roll into a sandwich loaf and place in a creased 8 by 4 inch loaf pan.  Cover with plastic wrap and let sit in warm spot for 2 hours until cresting above the lip of the pan.
Bake in 350F oven for 20 minutes, then turn 180 degrees and bake 20 minutes more.  If the top gets too dark cover with aluminum foil (I had to do this after the first 20 minutes).  Remove from pan and let cool completely (or at least 1 hour) before slicing.
Enjoy.


Read more ...

Saturday, January 12, 2013

Pumpkin Pancakes

Yum

These whole wheat pancakes are eggless, fat free, and flavored with pumpkin puree.


I like to make breakfast on the weekends.  I'm not a usual breakfast eater.  During the week it's just a granola bar or a smoothie, but  on the weekends I like to go all out (granted by the time I finish cooking it's usually more of a brunch or lunch but that's fine with me and Hubby).  This time I was out of eggs and only had a couple of strips of bacon so it took me a while to decide what to make.  I usually like a little salty with sweet for breakfast so I was definitely going to cook the bacon but it  wouldn't be enough, so I added some hash brown potatoes and pancakes.  My only problem was that I didn't have an egg for the pancakes.  Then I remembered I had a can of pureed pumpkin.  I know that mashed bananas are sometimes used as a substitute for eggs in baking, so why not pumpkin?  So I experimented and it worked, the pancakes were fluffy and soft and pumpkiny.  I will definitely make these again with or with or with out an egg.  Also these pancakes are fat free.  There is no oil or butter in the mix, however, I cooked them with butter and then topped with butter because I like the flavor.  If you have a good non-stick pan you may not need any oil or butter and you can make these really fat free if you want.

This recipe is modified from Low Fat Whole Wheat Pancakes

Ingreients:

3/4 cup whole wheat flour
2 Tbsp flax seed meal
2 Tbsp oat bran
1 tsp baking powder
1/2 tsp baking soda
1/2 tsp salt
1/2 tsp cinnamon
1/8 tsp allspice
1/2 cup pumpkin
1 cup skim milk kefir
2 Tbsp honey


Mix all of the dry ingredients in a medium bowl.  I use the flax and oat bran because I had it and it adds a little more fiber and nutrition.  You could just use 1 cup of whole wheat flour and omit the flax and oats.

In a separate small bowl mix the wet ingredients (pumpkin, kefir, and honey).  I used kefir instead of buttermilk because I had it and I make it with skim milk so I know it's fat free.  You could of course use buttermilk but I don't know if there is fat free buttermilk.  You could also use sour milk which is just 1 cup of milk with 1 tsp of vinegar and use skim milk.

When ready to make the pancakes, add the wet ingredients to the dry and stir until just mixed.  Then fry in a non-stick pan or on a griddle set to medium heat (I used an ice cream scoop to size these pancakes).  When edges set and you start to see bubbles, flip the pancake and cook the other side.  Makes 5 pancakes.  Serve with maple syrup. Enjoy.


Read more ...

Tuesday, December 11, 2012

Tutorial: How to Make Kefir

Yum

A fermented milk product that has great probiotic properties.  Kefir is easy to make and has many uses, all you need to get started are the grains.


I have mentioned and used kefir a few times in recipes on this blog such as in Pull Apart Pumpkin Bread or Brats in a Blanket.  I like to use kefir instead of buttermilk in any recipe, and it is also great as a beverage on it's own or in a smoothie. 

Kefir is said to contain more probiotics than yogurt and the fermenting process makes it more easily digestible for some people with lactose sensitivity.  Kefir can be made using any type of milk (goats, sheeps, cows, even coconut).  I use regular store bought skim milk and my kefir grains are alive and well.  So here is what you do.


First you need to obtain kefir grains.  I bought mine online and they were shipped to me, but if you know of anyone who makes kefir they can give you some (as kefir grains readily grow and multiply with each feeding).  Place the kefir grains into a clean glass jar and cover with milk. 


Then cover the jar with a towel or piece of cloth (to keep bugs away) and let sit at room temperature for 12-48 hours.  I let my kefir sit out over night and my room temperature is about 70-80 degrees, sometimes a little higher.  But if your temperature drops in the wintertime, that is okay.  You just may need to let the kefir sit longer or if it is warmer it might not need to sit as long.


When the kefir is ready, this is up to you experiment with different times to see what you prefer, the grains need to be separated from the kefir.  This is easily done using a strainer.  I strain my kefir into a clean plastic bowl with a pour spout so I can then transfer the kefir to a 2 liter jug that I keep in my refrigerator.


The strained kefir grains are ready to be reused, rinse out the glass jar and drop the grains back inside and cover with milk.  The process is ready to start again.  If you do not want to bother with your kefir grains for a while you can put them in the refrigerator.  As long as the grains are covered with milk I have kept them unused for up to 1 week, then I pull them out, strain them and pour in some fresh milk.

The kefir grains will grow and multiply as they are regularly fed.  I keep my kefir grains to about the size of a tablespoon.  As they grow you can give some to a friend or add some into a smoothie, or even eat some of the grains.  They are very nutritious and it is sad to just throw them away.


The strained kefir has many uses.  I try to make a fruit smoothie daily where I just blend kefir and frozen fruit together, I prefer it better than yogurt, and it is better for you than regular milk.  I also use kefir in any recipe that uses butter milk, and the kefir can even be used to make sour cream and cheeses, it is not exactly the same but it works. 

If you are interested in making kefir there are many sources online to learn more about the process.  One of my favorites is Dom's Kefir Site.  I hope that this tutorial has gotten you interested in making kefir.  Enjoy.


Read more ...